Copyright © 2007 - 2025, Coachworks For contact data Click Here.
Copyright © 2007 - 2025
Copyright © 2007 - 2025,
Coachworks For contact data
Click Here.
![]()
Rebuilding these is not rocket science, so why would we bother? The real magic is giving a damn about the details of an unglamorous component because even it matters.
... Read more about why here.
Rebuilding generators and starters isn't rocket science.
Designing one is more complicated, but once designed, the components are extremely simple: You have insulated wires of particular diameters that are wound into "field-coils" and "armatures", the number of turns of each winding matters, there can be no flaws in the insulation so "short circuits" can't happen in the coils, there are standard, permanently lubrlicated bearings to replace, and there's an area where (also replaced) chunks of graphite called "brushes" rub on an area of armatures with prescribed geometry and surface specification, and that's about it. Yes, there are combinations of armatures to field coils to keep track of and so forth, but the real magic is giving a damn about the details of an unglamorous component so that all the steps are performed properly.
Of course, for efficiency reasons, while sure, the technician turns one screw at a time, we normally do this assembly-line style in batches. The process is rather obvious: We tear down a good number of cores, at one time, we clean the various types of parts in batches, such as the end-plates - some call 'em "bells", we re-plate the case, field coil screws and through-bolts (sometimes they're screws), we sort through good and bad parts, weed out the bad stuff, and then we reassemble - always with new bearings and brushes, often with other new parts.
For us, usually date-coding is enough to identify a single generator as we normally don't have multiples of with the same code in the same batch. If that's not good enough, we can use our diamond-tipped engraving tool on the inside of a case to single one out.
Sometimes we won't have enough good pieces on hand to assemble all the good parts into completed units, so we therefore may have some stock on hand "in case of emergency." However, Bosch used as much commonality as possible among their products, so in most instances there's a VW or other branded product that can be used as a partial core, and with VW, the parts are definitely cheaper than Porsche.
 Taking
Them Apart With Care
Taking
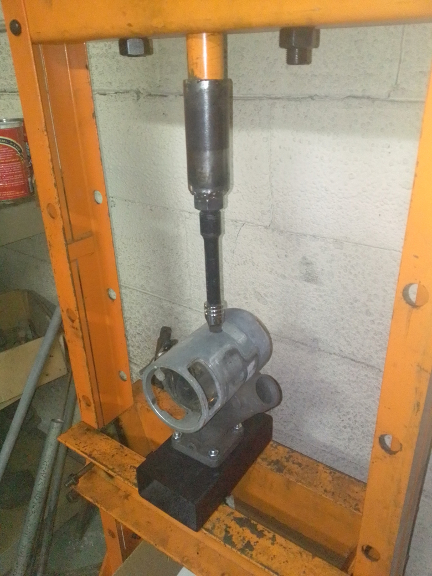
Them Apart With CareAs noted in the "why we're doing this" section, nobody we've found so far has bothered to make a tool to remove the field coil screws properly. So, we did. This means we can take them apart and reassemble them properly.
At right, you can see that we made a press tool that's based on the idea of using a generic hydraulic press to provide the pressure to keep the screwdriver inserted into the screw to be removed. What you can't see here is that under the press' ram, there's a spring between the ram and the part that provides the screw-driver function below it. The spring lets the screw driver go up or down as needed to install or remove while keeping high pressure on the bit to keep it in the slot.
Obviously, we also made a "base stand" to support the unit. We used the VW generator stand because the 6 and 12v systems have the same base mounting and because they're cheap.
We welded bolts into holes of the correct spacing, and can just swap the stand to change diameters. The VW straps, one 6v, one 12v, retain the unit - the generators are the same diameters, but the VW straps were designed for the VW stands. And, they're cheaper.
Less obviously, we had to make the screwdriver bit as it's a non-standard shape to have the blade fully fit the slot. But, again, this was not rocket science. And, as you can see, we can replace the bit.
 Plating
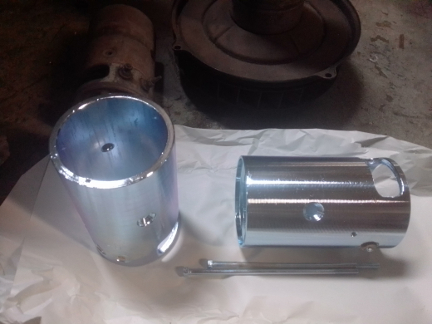
AT RIGHT: Here are a pair of cores and a pair of plated housings, just to illustrate where they start and where they end up.
 Reassembly
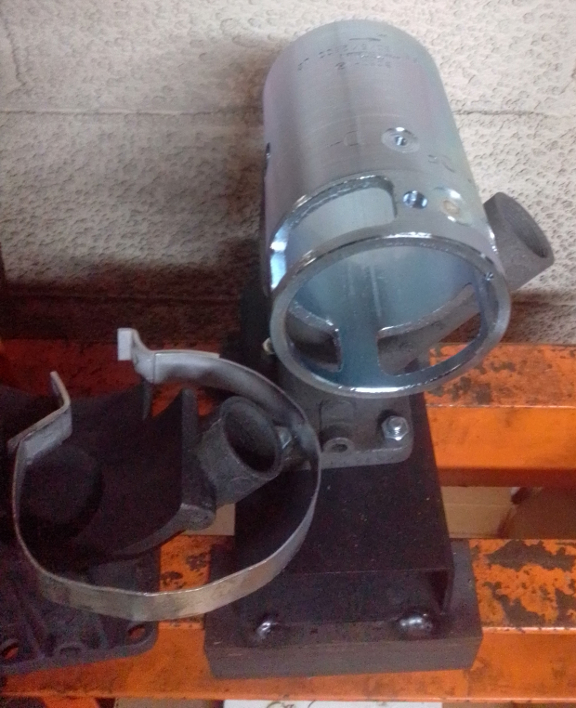
AT RIGHT: Here is where reassembly begins - by laying the freshly replated case into the cradle for installation of the field coils.
For about 20 years, we had a wonderful generator and starter rebuild shop barely 2 miles from our workshop - "East Bay Generator." We had a deal: we'd bring them 10 at a time an they'd tear them down and call us. We'd pick up the cases and go get them re-plated, usually with cadmium, but sometimes zinc. We'd bring these back along with some new basic hardware, like 7mm nuts for example, and they'd build them out to completed, tested units. They charged us only $45 each! Well... That didn't factor in our time getting the cases plated and hastle, but the total to our customers was generally around $150 per unit, which covered our costs and a little profit.
That all changed when they went out of business. Since then, we've tried several other shops and paid over $750 each time, and that's with the "shop to shop discount." AND, they always came back with the large field coil winding retaining screws boogered up. As if that wasn't bad enough, most wouldn't let us go replate the cases (?!) and sometimes would paint them ridiculous colors we didn't ask for, typically black, but sometimes silver, sometimes doing this even when we explicitly asked them not to. Worst of all, we'd sometimes have to wait long, indeterminate amounts of time for this, royally pissing off both us and our customers...
So, we decided to do them ourselves. It's NOT rocket science!