Copyright © 2007 - 2025, Coachworks For contact data Click Here.
Copyright © 2007 - 2025
Copyright © 2007 - 2025,
Coachworks For contact data
Click Here.
![]()
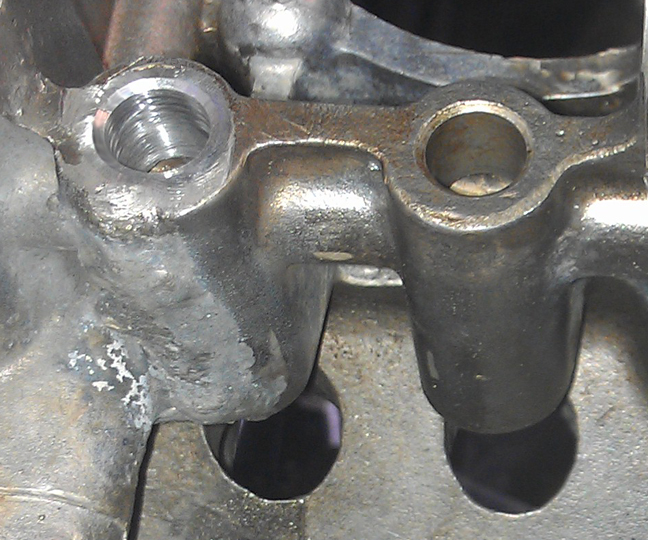
 Every
once in a while something goes wrong we have to fix or, well, there will be
some fun and excitement. In preparing crankcases, sometimes we find what we
didn't expect. In this example, we found that the lifter bore for exhaust number
four had a traumatic experience as though the lifer was partially inserted and
forced to go sideways. I can't think of how this could possibly happen in an
assembled engine, even if something horrible had gone wrong!
Every
once in a while something goes wrong we have to fix or, well, there will be
some fun and excitement. In preparing crankcases, sometimes we find what we
didn't expect. In this example, we found that the lifter bore for exhaust number
four had a traumatic experience as though the lifer was partially inserted and
forced to go sideways. I can't think of how this could possibly happen in an
assembled engine, even if something horrible had gone wrong!
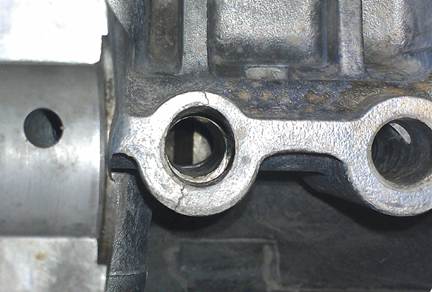
AT RIGHT: Very curious damage at the top 10mm or so of the lifter bore of exhaust #4. Note how deeper in the bore is OK. How it happened is a complete mystery.
Whatever caused it, the damage was shallow, and the lower part of the bore went unscathed. A lifter inserted in there DID ride OK and didn't appear to have perceptibly more play than non-injured one, and there was some sign someone ha run a lifter in there after whatver went wrong. ...The lifter bore is some 50mm tall (about 2 inches) and the damage was only in the upper 10mm or so, roughly down to the cross-drilled oil passage. Here you can see it.
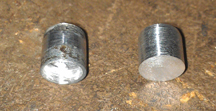
 I
am VERY sure the vast majority of engine builders would have shrugged and installed
a lifter and moved on, running this in the next rebuild as if nothing was wrong
- I've seen worse! However I / we are not that kind of engine builder! I realized
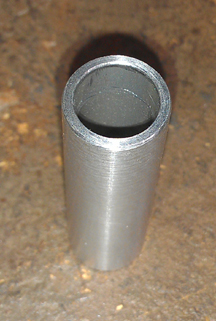
it was probably easily fixable by the creation of a lifter sleeve. I first made
an aluminum tube to insert, seen below. I then centered the damaged bore under
the quill on my mill and bored out the hole to a larger size and tapped in the
sleeve.
I
am VERY sure the vast majority of engine builders would have shrugged and installed
a lifter and moved on, running this in the next rebuild as if nothing was wrong
- I've seen worse! However I / we are not that kind of engine builder! I realized
it was probably easily fixable by the creation of a lifter sleeve. I first made
an aluminum tube to insert, seen below. I then centered the damaged bore under
the quill on my mill and bored out the hole to a larger size and tapped in the
sleeve.
AT RIGHT: Here's the sleeve, prior to installation, obviously!
BELOW: Here's the bore, ready for the sleeve.

So, here you can see it installed:
GOOD REPAIR, right?
Not So Fast! No!
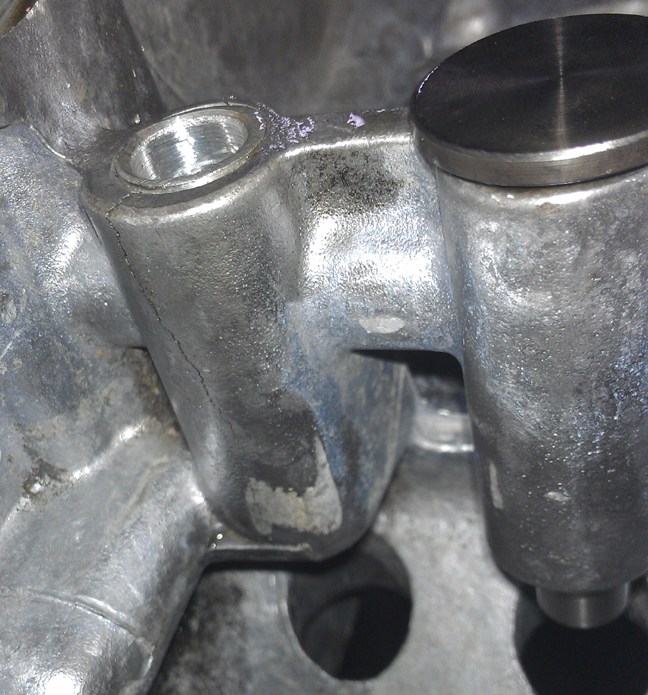 When
I installed it, I gave it 0.002" or so "crush" (interference
fit) so it wouldn't move with the lifter, but that only served to split the
crack open! Doah! You can see that here:
When
I installed it, I gave it 0.002" or so "crush" (interference
fit) so it wouldn't move with the lifter, but that only served to split the
crack open! Doah! You can see that here:
Now, the tube is trapped on both sides by substantial webing of the case internals and it might well be a fine fix. However, I would not accept that as a repair!
The solution, of course, was to weld the crack with the tube in place, effectively welding in the tube. I opted to make a new tube rather than use that one so that it was ready to have the top edge welded, too, to really keep the tube in place. Below you see it welded in and the initial chamfer already cut.
NOW THAT IS A QUALITY REPAIR.
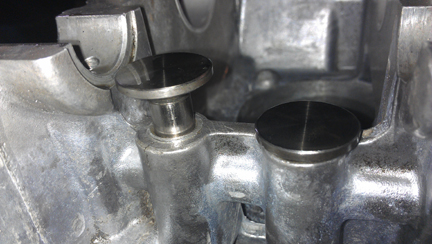
I then reamed the lifter bore to size, carefully removed the "soft plug" from the timing cover end (left here) and then drilled through the original oil passageway, and thus drilled through the new sleve, thus reopening the oil passage way. (That work was already done before the above image was taken - you can see the drilled passage through the open bore.) Then, the passage way was thoroughly cleaned, not just from chips from this process but also from whatever past debris may have been within it. Finally, I made a new "soft plug" for the case and hammered it home as you can see here.
BELOW: Back at the lathe, I made a new soft plug, then hammered it in, to complete the repair. The original is on the left, new on right. The light plays tricks; the old one is hollow! That whiteness is light reflecting off its inside.
Geez, wasn't that fun! Now that that distraction is dealt with, on to a thorough cleaning followed by assembly...