Copyright © 2007 - 2025, Coachworks For contact data Click Here.
Copyright © 2007 - 2025
Copyright © 2007 - 2025,
Coachworks For contact data
Click Here.
![]()
SPECIAL NOTICE
This engine and its web page is still under construction!
This disclaimer will be removed when all the images and text work has been completed.
Meanwhile, the contents are most likely accurate, just incomplete.
This engine, in long-block form, is ready for pickup or delivery now.
This 1954 Porsche 356 1500cc type 546 engine and has just undergone a complete overhaul, and is fully balanced for smooth running, long life, and a few more HP.
The crankcase is "numbers matching" and is in very good condition.
Every detail about the engine has been attended to, as outlined below; nothing was overlooked.
As with many others, I obtained this engine decades ago and, like some of the more interesting ones, kept it on an indoor engine shelf where it has sat until recently. The earlier history is completely unknown, but many people have seen this engine sitting on the engine shelf in the workshop, so you could perhaps jokingly call it a "well known engine!" I had originally intended to run it in my 1954 Coupe, but my Coupe originally had a Super, and I eventually found one that's more correct. But regarding this engine's specific history, I do recall that I obtained this engine sometime in the early 1990s.
I originally thought the crankcase was new but later came to realize that the number stamps are genuine Porsche and so it is virtually impossible that it was literally unused. However, that I suspected it was new does say something about how nice the case is.
I got the engine in pieces, so there was nothing to take apart.
The reason to rebuild this now was that while I don't have any particular application for it, I just finally decided that I wasn't getting any younger and I ought rebuild it.
The first thing to do was prepare the crankcase, but it didn't need much.
I fitted a "B" type crankshaft because it happens that the early pre-A and A crankshafts were more prone to breaking than the younger cranks are.
For me, "rebuilding the rods" means to:
This is all standard work so there aren't any photos of them in-process. However, here they are when assembled onto the crankshaft:
At right, the right case half, ready for assembly. The studs were removed during the case preparation phase for decking of the cylinders on this side.
Again, you can see how clean the crankcase is - I'm proud of that because it took so much work!
I got some new 1500 N camshafts, 546 104, from Richie Lukes's friend Dema (who is now my friend too). Here you can see the end of the one that went in this engine:
Note how the oil pump drive slot is perfect ... because it's new! And yes, that's a Sachs logo above the drive slot, and the LMB logo below. LMB is most notable for making 356 crankshaft pulleys. Sachs, meanwhile, is famous for cams and clutches, among many other parts.
To go with the new camshaft, the lifters were refaced:
Here's the short-block that emerged a few minutes later:
I then mounted the oil pump housing, oil sump screen, and oil control piston. Oh, this image of the sump studs belongs somewhere - they're in great condition:
Time to install the Pistons and Cylinders.
A reproduction set of pistons and cylinders is presently available for the two-piece crankcase 1500cc "normal" and I was thoughtful enough to buy a set instead of using used ones. Here they are, rings removed:
I've used several by now, one older (from the same vendor), and the newer ones have slight changes in the cylinder from the older production. On the set for this engine, the newer production, I found the OD on the cylinder head end a few thousandths large, but this was easily trimmed in the lathe.
In my view, piston weights need to match very closely in any single set, and I strive for 0.1 gram, while the stock specification for early engines is something like 16 grams, if I recall correctly. Whatever the exact spec., it's large, and I never assemble an engine that out-of-balance.
These pistons have three 2mm compression rings and one 5mm oil control ring, and appear to be exactly stock.
These are semetrical, non-offset pin, cast pistons - as original. The quality of the castings appears to be quite good.
When it comes to the cylinders, including fitting pistons to them, here's our process: Two of these steps require special tools most shops don't have.
I like to carefully measure everything and then mix-and-match the parts for superior fit. For example, the pistons are washed, and weighed bare, the pins weighed, and then pins and pistons are re-matched for a better balance.
In carefully matching up the parts, I have regularly found significant manufacturing errors with this process which would likely have gone unnoticed without these measures. It is remarkably easy, for example, to overlook the circumstance of the crankshaft bore not in the true center of the crankcase, angled on the horizontal left or right of center, or not on the same horizontal plane at all. Sometimes the pistons don't all have the same pin height (distance from pin center to crown). Examples of errors like these are not as uncommon as we would like. The key then is "did you even notice?!", and, if so, "what do you do about it?"
Here you can see (above right, and directly right) cylinders being fitted for height comparison check - this is done to ensure that there are no difference between the cylinder heights that the head itself "sees." The book value for tolerated error is 0.1mm (four thousandths of an inch), but in this case, there was no measurable difference between one pair, and about 0.002" (two thousandths of an inch, or 0.05 mm) for the other.
Note that as a part of this work, one fits the cylinders to the case looking for interference with the cap nuts or through bolts. Invariably, no matter who made the cylinders (almost without exception), there's an interference somewhere. Generally, the cylinder is ground slightly to provide clearance, but some engine builders grind the cap nut or bolt head. These cylinders hve a nice thick bottom rim which is easier to control for such grinding than some cylinders out there, like the NPRs, which usually strike on the lowest fin.
The next thing we do is something nobody else does (that we know of) in the engine building process, and that is to measure the height the piston crown comes above the plane of the top of the cylinder. I call this the CAC, or "Crown Above Cylinder." This value is important because, firstly, it can reveal deeper problems, and because it helps us get the compression ratio equal in all four cylinders.
Here are some of the deeper problems that can be discovered through a CAC check:
In order to do this for these engines, you have to have special tools. Here, you can see them in action at right.
If you can't read the dial face in the image at right, the distance between the smallest tick marks is one hundredth of a mm, or 0.0004", and you can discern to perhaps a tenth of that! So, this is a very accurate measure, performed while the cylinder is under torque, so any shims are squished flat, etc.
The accuracy is so good, that if you take the time to swap parts around, you can accurately determine discrepancies in the manufacture of the various parts! But, we ARE splitting hairs here! However, a benefit to both engine builder and customer is that the ability to move parts around for better fit means that perfection is more easily achieved, and the more equal the HP production of each cylinder, the smoother the engine will run, and the more HP the engine will produce overall.
Because this process includes the entire assembly, torqued as in service, and measures the height each piston protrudes out of its cylinder, all errors in connecting rod lengths, cylinder heights, crankcase spigots depths (cylinder bore deck), piston connecting pin heights, and shim thickness' are accounted for in the measurement results. There is no superior method.
Here are two of the pistons, bare, cleaned, weighed, matched up with pins and then assigned an installation position:
Once this work is done, one needs the heads to be ready to confirm combustion chamber sizes in both heads, do any shimming, then mount the rings and install the pistons and cylinders.
As a result of this measurement work, it was determined that ....
Now the engine is ready for the pistons and cylinders to be installed, followed by the cylinder heads.
The heads had all original bronze seats in them. Richie said that they liked them because they seal more reliably than steel seats, at the expense of longevity. Well, we want longevity now, and another problem is that bronze seats don't tolerate unleaded fuels very well, and we have better materials than they did then, so installing new steel seets seemed the thing to do.
"Install new seats and guids" is very easily said, but very hard to do! The reason is that the specifications book lists three different setups, all with different installation dimensions, and none of the parts are readily available anyway. So, you have to carefully measure which of the three possible types is presently installed and then make the new parts to fit! That's right, the valve guides and seats had to be made for these purposes "from scratch." (Pretty useful stuff, that scratch!) Actually, we don't start with ore and don't have our own smelter, but rather source similar, appropriately sized parts and then modify them to fit correctly. You can see the new seats pretty clearly in the image above, while the guides are harder to see here, but are more easily seen in later images (below).
The valve gear is B era, and, like the cran, they can be fitted and have some engineering advantages. All the valves were all cleaned, refaced and polished.
In these images you can see further work on the heads; the heads were both decked and fly-cut because to install seats, the heads have to be heated pretty high, but cannot be supported during this heating and they can warp slightly. Decking afterward ensures the cylinder seats are in the same plane. Then, the surface closest to the crankcase gets cut down to match however much was taken out in cleaning up the cylinder sealing surface, thus ensuring the heads don't foul on the cylinder's top fin.
Also, didn't think to show a closeup on these heads, but perhaps you can still see in the first image of this section how well the new seats fit these heads - they're perfectly centered, match in ID and height. I'm very pleased with the work as sometimes there are small errors to clean up later with a die-grinder - none of that needed here!
In these next images of the head (right and below), the valve seats are ground, and valves installed...
...And the combustion chamber volumes have been measured.
Note that there are some exhaust studs missing; the threads have already been checked, and I'll install new studs when the heads are mounted up as it's easier that way.
Also notice that there are no broken fins or other issues.
It was decided to use single springs instead of the original dual-springs. All original assemblies were dual-spring types, but Porsche later substituted a single-spring type, the so-called "third version", and provided the specifications for these in this specifications book. After quite a bit of hunting, I was fortunate enough to find springs that are a good match to the originals. As there are always production varriations in all mass produced parts, I always use these differences to match up slightly stiffer springs with the heavier valves (intakes are about 2% heavier than exhausts), so they're very close sets, matched up, so all the valves tend to float at the same time. ...Of course, each valve and retainer are position-specific through the shimming process...
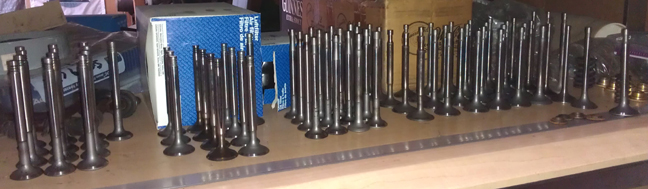
Oh, the valves came from this stash, all checked for wear, refaced, and with the stems polished:
The rocker gear was all thoroughly cleaned and the contact surfaces refaced. I did two sets (plus) recently - this is one of those two sets:
OK, bolt on those heads! Here are the results:
...During the rocker assembly process, most of the adjustment screws had to be replaced, and they consumed up the last of my NOS stock. All the adjustment screws are fantastic... As always, new adjustment nuts were fitted.
The other side, just as nice:
The gear on the oil pump drive shaft needed replacement, so I pressed it off, and found it was a very early shaft indeed - you don't see these splines on younger ones:
The new gear went on easily and is secure. ... Most oil pump drive shafts are smooth (no splines like this one), and a few very late ones (but not all) have a woodruf key securing the gear to the shaft. These splines are unique to the early pumps.
I then repaired the tang that fits into the camshaft by welding new material on to the worn places and then refacing it - this is a typical issue with the typical solution. The newly welded on material is harder than the original steel, so it should wear less. Oh yes, a new oil seal was installed on the tachometer drive shaft.
Here it is as a longblock, minutes away from being ready for pickup or delivery - just valve covers...
The distributor drive shaft has not been installed because it should be left out until a distributor will be installed. Otherwise, if anyone rotates the engine backwards, the drive gear will ride up on the bronze crankshaft gear and may damage it....
NOTE: If this engine is sold as a long-block... One should NOT install the distributor drive gear without also installing a distributor because if anyone rotates the engine backwards, it will push the drive gear up where it can damage the bronze drive gear! Therefore, the distributor drive is NOT mounted until the last reasonable moment!
When you're ready for work on your machine, just let us know.
Because some people are keeping logs of VIN and engine numbers and then purport to tell people what someone else has, out of respect and concern for a buyer's privacy, exact VIN and engine number data are not published here.